这篇文章会介绍CPython 2.7.12中字符串intern的知识。
首先举一个例子说明内置的intern函数的用法:
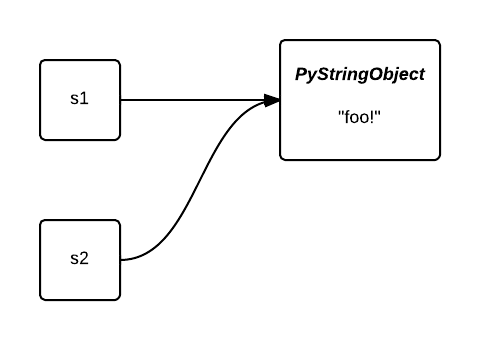
>>> s1 = 'foo!'
>>> s2 = 'foo!'
>>> s1 is s2
False
>>> s1 = intern('foo!')
>>> s1
'foo!'
>>> s2 = intern('foo!')
>>> s1 is s2
True
你应该已经体会到了用法,但是,在python内部它是怎么工作的呢?
String Intern(字符串驻留)
PyStringObject结构体
我们需要深入CPython的源码,表示Python字符串的C结构体PyStringObject在stringobject.h文件中:
typedef struct {
    PyObject_VAR_HEAD
    long ob_shash;
    int ob_sstate;
    char ob_sval[1];

    /* Invariants:
     *     ob_sval contains space for 'ob_size+1' elements.
     *     ob_sval[ob_size] == 0.
     *     ob_shash is the hash of the string or -1 if not computed yet.
     *     ob_sstate != 0 iff the string object is in stringobject.c's
     *       'interned' dictionary; in this case the two references
     *       from 'interned' to this object are *not counted* in ob_refcnt.
     */
} PyStringObject;
根据注释,如果字符串被interned,变量ob_sstate的值将不再等于0。一般来说,我们不会直接接触这个变量,而是通过下面定义的宏PyString_CHECK_INTERNED来读取它:
#define PyString_CHECK_INTERNED(op) (((PyStringObject *)(op))->ob_sstate)
interned字典
然后,让我们来看stringobject.c。24行定义了一个对象的引用,interned字符串将会存放在这个对象里。
static PyObject *interned;
实际上,这个对象就是一个正常的Python字典,在第4744行被初始化
interned = PyDict_New();
最终,所有的魔法都在第4731行``PyString_InternInPlace函数中发生。下面是函数实现:
PyString_InternInPlace(PyObject **p)
{
    register PyStringObject *s = (PyStringObject *)(*p);
    PyObject *t;
    if (s == NULL || !PyString_Check(s))
        Py_FatalError("PyString_InternInPlace: strings only please!");
    /* If it's a string subclass, we don't really know what putting
       it in the interned dict might do. */
    if (!PyString_CheckExact(s))
        return;
    if (PyString_CHECK_INTERNED(s))
        return;
    if (interned == NULL) {
        interned = PyDict_New();
        if (interned == NULL) {
            PyErr_Clear(); /* Don't leave an exception */
            return;
        }
    }
    t = PyDict_GetItem(interned, (PyObject *)s);
    if (t) {
        Py_INCREF(t);
        Py_DECREF(*p);
        *p = t;
        return;
    }

    if (PyDict_SetItem(interned, (PyObject *)s, (PyObject *)s) < 0) {
        PyErr_Clear();
        return;
    }
    /* The two references in interned are not counted by refcnt.
       The string deallocator will take care of this */
    Py_REFCNT(s) -= 2;
    PyString_CHECK_INTERNED(s) = SSTATE_INTERNED_MORTAL;
}
可以看到,interned字典中的keys都是指向字符串对象的指针,values也是同样的指针。另外,字符串的派生类不能被intern。不考虑错误检查和引用计数,我们可以用如下伪代码重写这个函数:
interned = None

def intern(string):
    if string is None or not type(string) is str:
        raise TypeError

    if string.is_interned:
        return string

    if interned is None:
        global interned
        interned = {}

    t = interned.get(string)
    if t is not None:
        return t

    interned[string] = string
    string.is_interned = True
    return string
简单吧!
字符串intern的好处
共享对象
为什么你要使用字符串intern?首先,共享字符串对象可以减少内存占用。让我们回到第一个例子,一开始,变量s1和s2指向两个不同的对象。

在intern之后,他们都指向了同一个对象。第二个对象占用的内存被节省下来了。
在处理一些低信息熵的大列表的时候,intern非常有用。例如,当我们解析一个语料库,we could benefit from the very heavy-tailed distribution of word frequencies in human languages to intern strings to our advantage。下面的例子中,我们会使用NLTK来导入Hamlet by Shakespeare,使用Heapy来观察intern前后对象的堆栈使用:
import guppy
import nltk

hp = guppy.hpy()
hp.setrelheap()

hamlet = nltk.corpus.shakespeare.words('hamlet.xml')
print hp.heap()

hamlet = [intern(wrd) for wrd in nltk.corpus.shakespeare.words('hamlet.xml')]
print hp.heap()


$ python intern.py

Partition of a set of 31187 objects. Total size = 1725752 bytes.
 Index  Count   %     Size   % Cumulative  % Kind (class / dict of class)
     0  31166 100  1394864  81   1394864  81 str
...

Partition of a set of 4555 objects. Total size = 547840 bytes.
 Index  Count   %     Size   % Cumulative  % Kind (class / dict of class)
     0      4   0   328224  60    328224  60 list
     1   4529  99   215776  39    544000  99 str
...
如你所见,我们极大地减少了字符串对象的数量(从31187减少到4555),并且内存占用减少了6.5倍
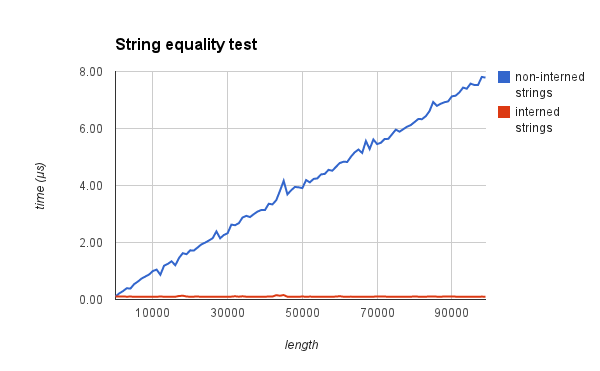
指针比较
第二,我们可以用O(1)的指针比较来代替O(n)的字节比较
为了验证这个,我测量了在比较两个字符串是否相等的时,intern与否分别的时间。下面的图应该能说服你:
Native interning
在一些条件下,字符串会被原生interning。还是第一个例子,如果我用foo而不是foo!,字符串s1和s2就会被自动地intern。
>>> s1 = 'foo'
>>> s2 = 'foo'
>>> s1 is s2
True
Interned or not interned?
写这篇文章之前,我一直在想,在后台,字符串会根据一个参考字符串长度和构成它们的字符的规则来执行intern。我的想法离正确答案很近,但是,当我操作几组创建方法不同的字符串时,我无法推测出这条规则到底是什么!
>>> 'foo' is 'foo'
True
>>> 'foo!' is 'foo!'
False
>>> 'foo' + 'bar' is 'foobar'
True
>>> ''.join(['f']) is ''.join(['f'])
True
>>> ''.join(['f', 'o', 'o']) is ''.join(['f', 'o', 'o'])
False
>>> 'a' * 20 is 'aaaaaaaaaaaaaaaaaaaa'
True
>>> 'a' * 21 is 'aaaaaaaaaaaaaaaaaaaaa'
False
>>> 'foooooooooooooooooooooooooooooo' is 'foooooooooooooooooooooooooooooo'
True
在看完这些例子后,你要承认,确实非常难以确定系统是根据什么来执行原生的intern。我们还需要阅读更多的CPython代码来找出答案。
Fact 1: all length 0 and length 1 strings are interned
还是在stringobject.c,我们这些要看PyString_FromStringAndSize和 PyString_FromString函数中都有的一些代码:
/* share short strings */
if (size == 0) {
    PyObject *t = (PyObject *)op;
    PyString_InternInPlace(&t);
    op = (PyStringObject *)t;
    nullstring = op;
    Py_INCREF(op);
} else if (size == 1 && str != NULL) {
    PyObject *t = (PyObject *)op;
    PyString_InternInPlace(&t);
非常清晰:所有长度为0和1的字符串都会被intern。
Fact 2: 在编译期间字符串会被interned
你写的Python代码并不是直接被解释器执行,代码会通过一个经典的编译链来生成一种中间语言:bytecode(字节码)。python字节码是被Python解释器这个虚拟机执行的一系类指令。你可以在这里看到所有的指令。通过使用dis模块,你可以看到一个函数或模块执行了哪些指令:
>>> import dis
>>> def foo():
...     print 'foo!'
...
>>> dis.dis(foo)
  2           0 LOAD_CONST               1 ('foo!')
              3 PRINT_ITEM
              4 PRINT_NEWLINE
              5 LOAD_CONST               0 (None)
              8 RETURN_VALUE
正如你知道的,在Python中,一切皆对象。代码也是Python对象,它表示了一块字节码。一个代码对象带有执行时所需要的所有信息:常量,变量名等。我们发现,当在Python中创建代码对象的时候,有一些字符串被intern了:
PyCodeObject *
PyCode_New(int argcount, int nlocals, int stacksize, int flags,
           PyObject *code, PyObject *consts, PyObject *names,
           PyObject *varnames, PyObject *freevars, PyObject *cellvars,
           PyObject *filename, PyObject *name, int firstlineno,
           PyObject *lnotab)

           ...
           /* Intern selected string constants */
           for (i = PyTuple_Size(consts); --i >= 0; ) {
               PyObject *v = PyTuple_GetItem(consts, i);
               if (!PyString_Check(v))
                   continue;
               if (!all_name_chars((unsigned char *)PyString_AS_STRING(v)))
                   continue;
               PyString_InternInPlace(&PyTuple_GET_ITEM(consts, i));
           }
在codeobject.c中,consts元组包含了在编译期间定义的字面量:布尔值,浮点数,整数和在你的程序中声明的字符串。在这个元祖中存储的字符串,如果没有被all_name_chars函数过滤掉的话,将会被全部intern。
下面的例子中,s1是在编译期间被声明的。相反的是,s2是在运行时产生的:
s1 = 'foo'
s2 = ''.join(['f', 'o', 'o'])
结果是,s1将会被intern,s2不会。
all_name_chars方法将会过滤掉不是由ascii字符,数字和下划线构成的字符串(Python中变量名的命令规范):
#define NAME_CHARS \
    "0123456789ABCDEFGHIJKLMNOPQRSTUVWXYZ_abcdefghijklmnopqrstuvwxyz"

/* all_name_chars(s): true if all chars in s are valid NAME_CHARS */

static int
all_name_chars(unsigned char *s)
{
    static char ok_name_char[256];
    static unsigned char *name_chars = (unsigned char *)NAME_CHARS;

    if (ok_name_char[*name_chars] == 0) {
        unsigned char *p;
        for (p = name_chars; *p; p++)
            ok_name_char[*p] = 1;
    }
    while (*s) {
        if (ok_name_char[*s++] == 0)
            return 0;
    }
    return 1;
}
理解了这些,我们就知道了为什么'foo!' is 'foo!'等于False,而'foo' is 'foo'等于True,胜利了吗?还没有!
字节码优化产生了更多字符串常量
这听起来和直觉不符,但是在下面的例子中,字符串连接的输出不是在运行时,而是在编译时:
>>> 'foo' + 'bar' is 'foobar'
True
这就是为什么'foo' + 'bar'也被intern了,表达式等于True。
怎么做到的?倒数第二的源码编译器生成了第一个版本的字节码。这个原始的字节码最终会进入最后一个编译器,被称作“窥孔优化”(peephole optimization)
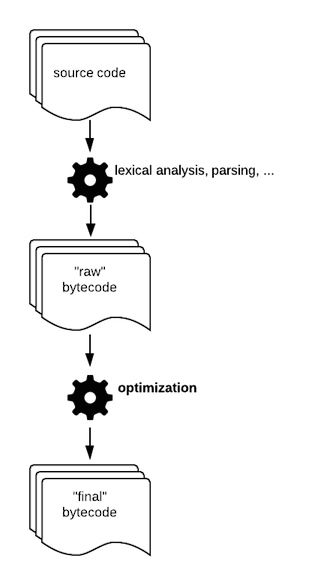
这一步的目标是通过替换更快的指令来产生更加高效的字节码。
常量合并Constant folding
在窥孔优化期间,应用到的一项技术就是常量合并,使用更加简单的常量。想象你是一个编译器,你看到了下面这行:
SECONDS = 24 * 60 * 60
你能做什么来简化这个表达式以在运行时节约几个时钟周期。你可以用计算好的值86400来替换这个表达式。这就是foo' + 'bar'发生的事。让我们定义一个foobar函数,分解相关的字节码:
>>> import dis
>>> def foobar():
...         return 'foo' + 'bar'
>>> dis.dis(foobar)
  2           0 LOAD_CONST               3 ('foobar')
              3 RETURN_VALUE
看到了吧!根本没有看到加法和初始的两个常量'foo'和'bar'。如果CPython字节码没有被优化,那么输出应该是这样的:
>>> dis.dis(foobar)
  2           0 LOAD_CONST               1 ('foo')
              3 LOAD_CONST               2 ('bar')
              6 BINARY_ADD
              7 RETURN_VALUE
我们解决为什么下面的表达式正确的问题:
>>> 'a' * 20 is 'aaaaaaaaaaaaaaaaaaaa'
避免大的 .pyc 文件
那么为什么'a' * 21 is 'aaaaaaaaaaaaaaaaaaaaa'不等于True呢?你还记得在你的包里面会看到的.pyc文件吗。如果一个人写了诸如['foo!'] * 10**9的代码会怎么样呢?这样会导致.pyc文件非常巨大!为了避免这个现象,窥孔优化中产生的序列长度如果大于20,将会被丢弃。
补充
窥孔优化
顾名思义,是一种很局部的优化方式,编译器仅仅在一个基本块或者多个基本块中,针对已经生成的代码,结合CPU自己指令的特点,通过一些认为可能带来性能提升的转换规则,或者通过整体的分析,通过指令转换,提升代码性能。别看这些代码转换很局部,很小,但可能会带来很大的性能提升。
这个窥孔,你可以认为是一个滑动窗口,编译器在实施窥孔优化时,就仅仅分析这个窗口内的指令。每次转换之后,可能还会暴露相邻窗口之间的某些优化机会,所以可以多次调用窥孔优化,尽可能提升性能。
窥孔优化可以在四个方面寻找优化机会:冗余指令删除,包括冗余的load和store指令以及死代码(不会执行的代码);控制流优化;强度削弱;利用特有指令。